Managing TLS client certificates
The TLS Client Certificates page allows you to:
-
CSR tab: Submit a certificate signing request (CSR) to a DFSP to request that your TLS client certificate be signed by a DFSP’s CA.
-
Sent CSRs tab: View the status of sent CSRs and view or download the CSR or the signed certificate itself.
-
Unprocessed DFSP CSRs tab: Manage DFSP CSRs, that is, view and download CSRs and certificates, sign certificates, and upload signed certificates.
Creating a Hub certificate signing request

To create a certificate signing request (CSR) for sending to a DFSP, complete the following steps:
| On uploading a certificate, MCM renames the file so that the file name includes information about: 1) the type of certificate (for example: root, intermediate, server), 2) the environment (for example: sandbox, staging, production), 3) the name of the DFSP. |
This means that when uploading a certificate to MCM, you will see the original file name of your certificate change to a value assigned by MCM.
-
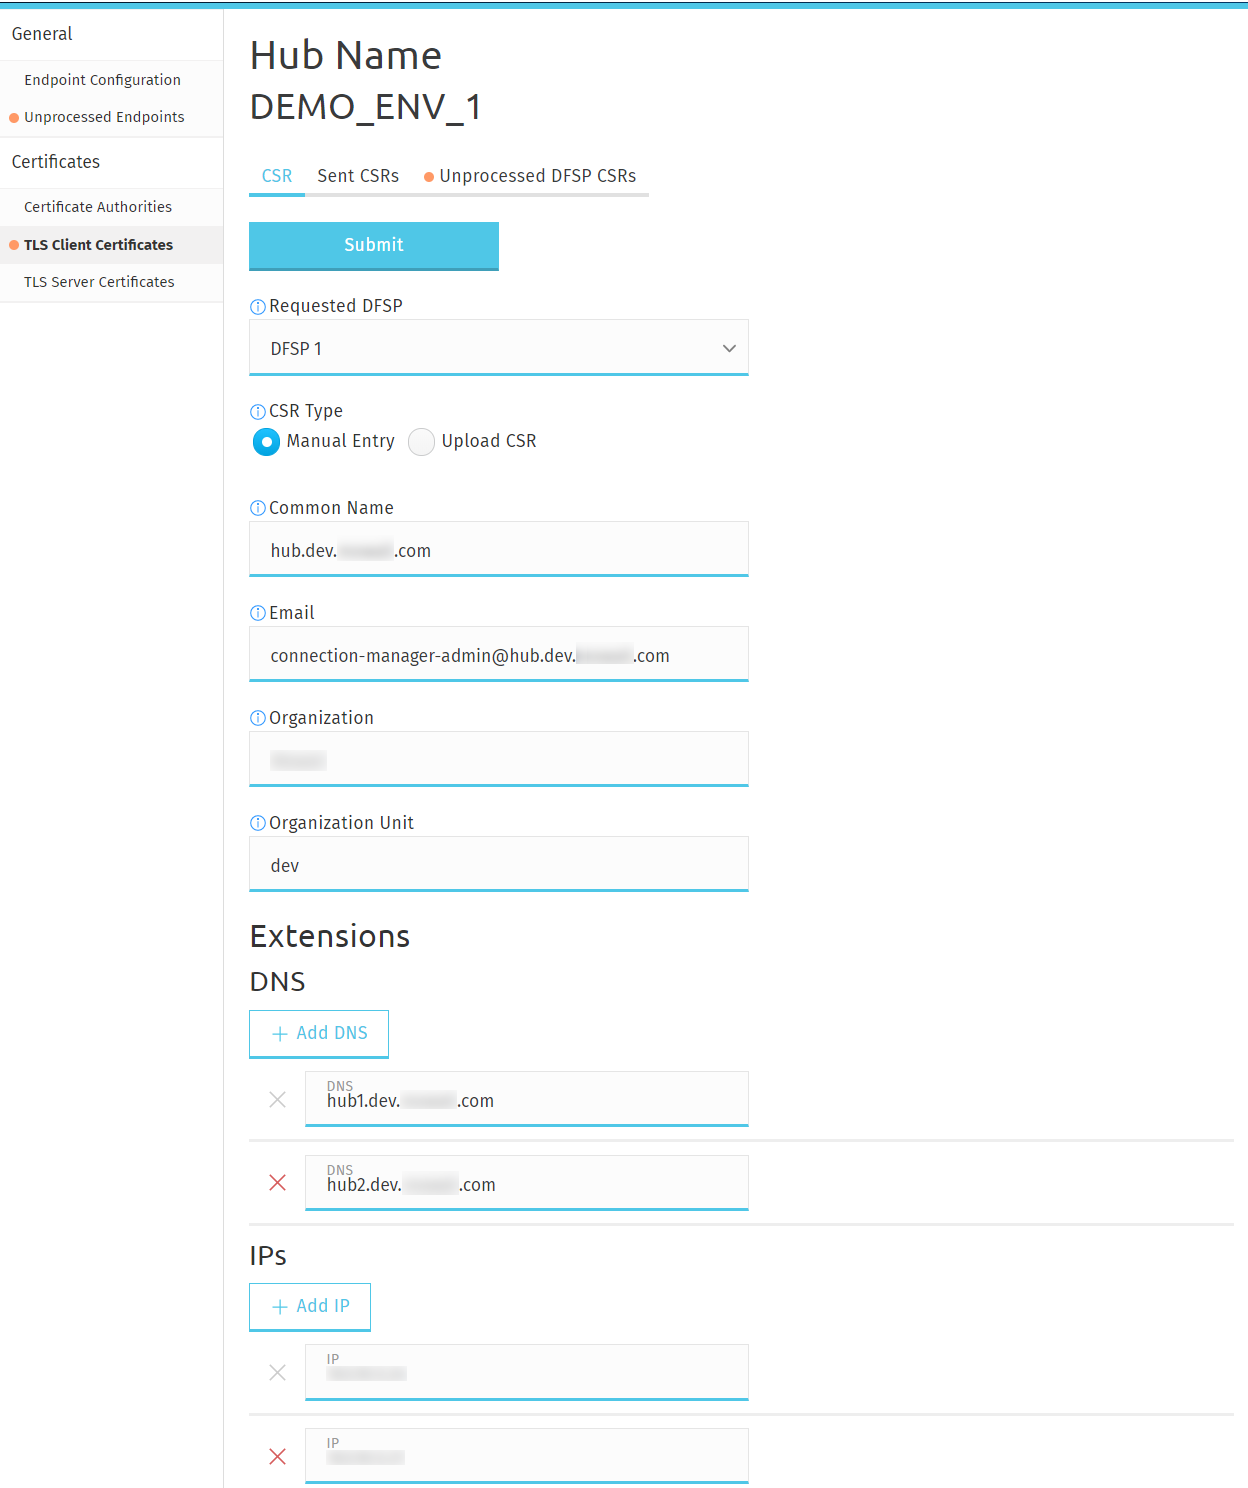
Go to the CSR tab.
-
In the Requested DFSP field, select the DFSP that you want to send the CSR to.
-
In the CSR Type field, select how you want to create the CSR:
-
To upload a CSR already created:
-
Select Upload CSR.
-
In the CSR field, click Choose File, and select the CSR file saved on your computer.
NOTE: If you have accidentally uploaded the wrong CSR, you can re-upload a new CSR and that will replace the old one. -
Go to Step 4.
-
-
To manually create a CSR:
-
Select Manual Entry. Note that this option is only available if you have already set up the Hub CA.
-
Fill in the fields displayed, they are all mandatory: Common Name, Email, Organization, Organization Unit.
NOTE: Some additional mandatory fields are currently not displayed and hence cannot be specified here, they are: Locality, State, Country. This is a known issue and will be fixed in a future version of the product. -
Optionally, fill in the DNS and IP fields under Extensions.
-
Go to Step 4.
-
-
-
Click Submit to send the CSR to the DFSP.
Retrieving the Hub’s TLS client certificate CSR signed by a DFSP

To retrieve a TLS client certificate signed by a DFSP, complete the following steps:
-
Go to the Sent CSRs tab. You can search for a sent CSR by typing a keyword (such as the DFSP’s name) in the Search Sent CSRs search box and pressing Enter.
The Status indicator displays the status of your sent CSR. If it says Certificate created, then that means that the CSR has been signed by the receiving DFSP. -
You can click Validate Certificate to check the validity of your signed certificate. The following details are validated:
-
The CSR’s signature must match the public key.
-
The CSR’s signature algorithm must be "sha256WithRSAEncryption". Note that the validation also accepts "sha512WithRSAEncryption".
-
The CSR public key length must be 4096 bits.
-
The CSR and certificate must have the same public key.
-
The CSR and certificate must have the same Subject information.
-
The CSR must have all mandatory Distinguished Name attributes. These are: Common Name (CN), Organizational Unit (OU), Organization (O), Locality (L), State (ST), Country (C), and Email Address (E).
-
The certificate public key must match the private key used to sign the CSR. Only available if the CSR was manually created (MCM has the private key) instead of uploaded.
-
The certificate must be valid at the present time according to the certificate validity period.
-
The certificate’s signature algorithm must be "sha256WithRSAEncryption".
-
The certificate must be signed by the DFSP CA.
-
-
Click Download Certificate to download your signed certificate, which is now ready to be installed in the outbound API gateway.
Signing a DFSP’s TLS client certificate CSR

After a DFSP has sent a CSR for their TLS client certificate, you are able to retrieve it for signature. To sign a DFSP’s TLS client certificate CSR using the CA set up on the Certificate Authorities page, complete the following steps:
-
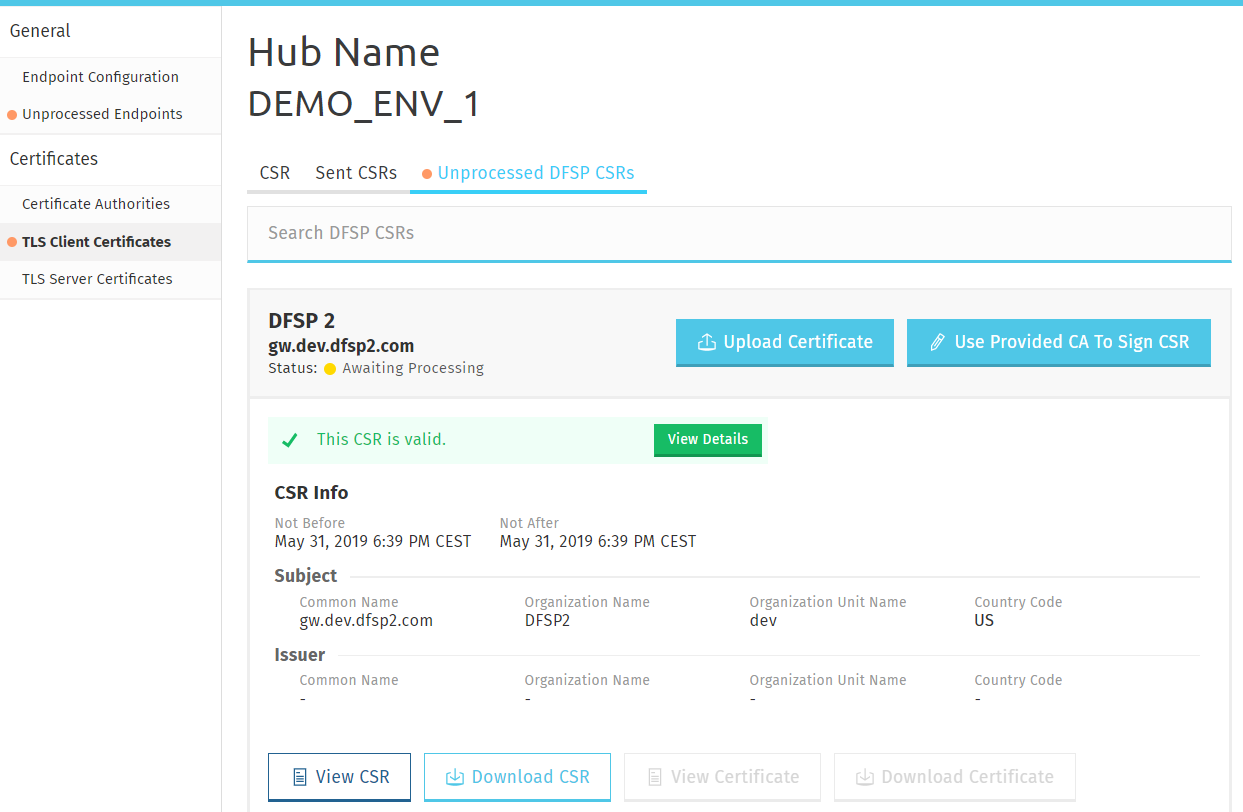
Go to the Unprocessed DFSP CSRs tab. You can search for a sent CSR by typing a keyword in the Search Sent CSRs search box and pressing Enter.
-
To sign the DFSP’s CSR using the embedded CA, click Use Provided CA To Sign CSR. This will use the CA set up on the Certificate Authorities page to sign the CSR.
The Status indicator will change to CSR created to indicate that signing the DFSP’s CSR has been successful.
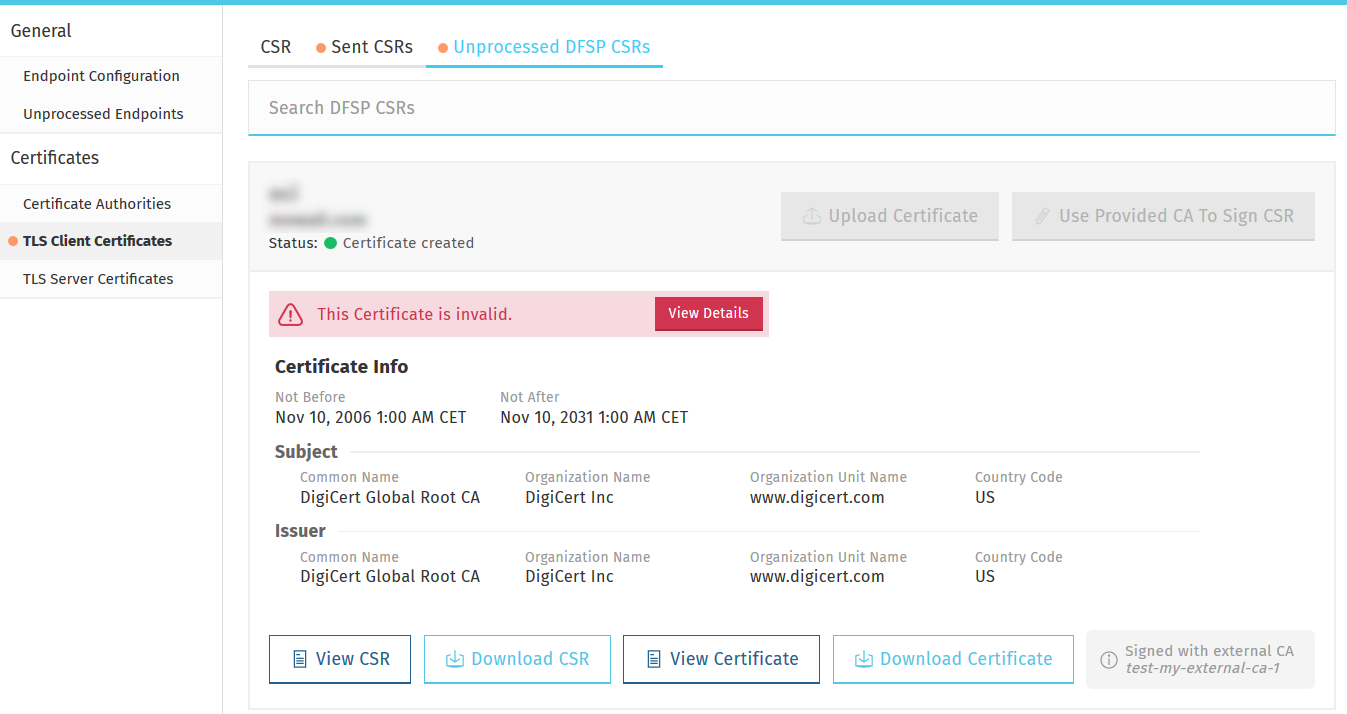
Information about the validity of the certificate will also be displayed. Click View Details for information on possible validity issues. The following details are validated:-
The CSR’s signature algorithm must be sha256WithRSAEncryption. Note that the validation also accepts sha512WithRSAEncryption.
-
The CSR public key length must be 4096 bits.
-
The CSR and certificate must have the same public key.
-
The CSR and certificate must have the same Subject information.
-
The CSR must have all mandatory Distinguished Name attributes. These are: Common Name (CN), Organizational Unit (OU), Organization (O), Locality (L), State (ST), Country (C), and Email Address (E).
-
The certificate public key must match the private key used to sign the CSR. Only available if the CSR was manually created (MCM has the private key) instead of uploaded.
-
To sign a DFSP’s TLS client certificate CSR using an external third-party CA, complete the following steps:
| For this option to work, you must have uploaded external Hub CA certificates through the Certificate Authorities page > the HUB External Certificate Authority tab. |
-
Go to the Unprocessed DFSP CSRs tab. You can search for a sent CSR by typing a keyword in the Search Sent CSRs search box and pressing Enter.
-
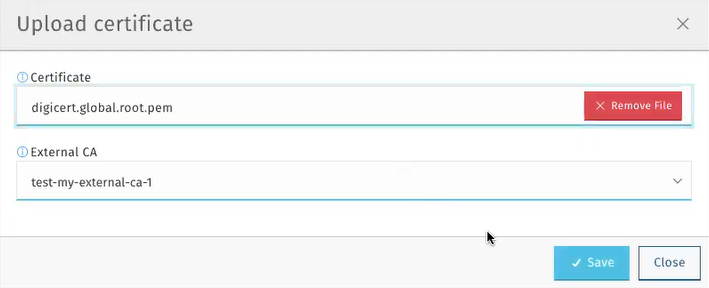
To sign the DFSP’s CSR using an external CA, click Upload Certificate. This will use the external CA recorded on the Certificate Authorities page > HUB External Certificate Authority tab to sign the CSR.
The Upload certificate pop-up window will be displayed, prompting you to select the CA you want to use to sign the DFSP’s CSR. -
In the Certificate field, click Choose File and select the relevant external CA. This will fill in the External CA field with the name of the CA that you have selected.
-
Click Choose File again, and select the root certificate of the CA saved on your computer.

-
Click Save.
The Status indicator will change to CSR created to indicate that signing the DFSP’s CSR has been successful.
Information about the validity of the certificate will also be displayed. Click View Details for information on possible validity issues. The following details are validated:-
The CSR’s signature algorithm must be sha256WithRSAEncryption. Note that the validation also accepts sha512WithRSAEncryption.
-
The CSR public key length must be 4096 bits.
-
The CSR and certificate must have the same public key.
-
The CSR and certificate must have the same Subject information.
-
The CSR must have all mandatory Distinguished Name attributes. These are: Common Name (CN), Organizational Unit (OU), Organization (O), Locality (L), State (ST), Country (C), and Email Address (E).
-
The certificate public key must match the private key used to sign the CSR. Only available if the CSR was manually created (MCM has the private key) instead of uploaded.
-
You can also download the signed certificate for installation in the API gateway trust store. To do that, click Download Certificate.
When downloading an uploaded certificate, the default extension is set to .csr. If you wish to download the certificate in another format (for example, .cer), in the Save As dialog box, edit the file name and the file type so you get the certificate in the required format.
|