Mojaloop security
Overview
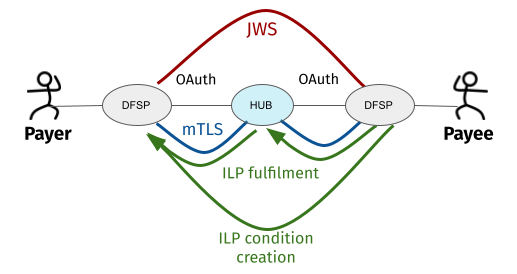
Any implementation of a Mojaloop Hub employs the following security measures:
-
Mutual Transport Layer Security (mTLS) secures the communication channel for bi-directional asynchronous connections.
-
OAuth 2 is used to provide role-based access to Hub endpoints (API authorization).
-
IP whitelisting reduces the attack surface of the Hub.
-
JSON Web Signature (JWS) as defined in RFC 7515 (JSON Web Signature (JWS)) ensures the Payer DFSP and the Payee DFSP can trust that messages shared between each other have not been modified by a third party.
-
Interledger Protocol (ILP) ensures the integrity of transfers and that the agreement between parties to make a transfer is binding. Any transfer is preceded by a preparation step to generate a condition that has to be fulfilled for the transfer to happen. The condition and the fulfilment also act as cryptographic proof that a transaction is secure and that messages exchanged between DFSPs have not been tampered with.
Putting the above security measures into practice requires extensive information sharing and technical configuration from different teams in both DFSP and Hub entities. This is where Connection Wizard can help. It facilitates the sharing of mTLS and JWS digital certificates, as well as endpoint information in a guided way.
The next sections provide background information about the processes that Connection Wizard facilitates.
Certificates
TLS certificates
Two-way TLS or mutual TLS authentication relies on both parties (client and server) sharing their public certificates with each other and performing verification/validation based on that.
The following high-level steps describe how connection is established and data is transferred between a client and server in the case of mTLS:
-
The client requests a protected resource over the HTTPS protocol and the SSL/TLS handshake process begins.
-
The server returns its public certificate to the client along with a server hello.
-
The client validates/verifies the received certificate. The client verifies the certificate through the Certificate Authority (CA) for CA-signed certificates.
-
If the server certificate was validated successfully, the server requests the client certificate.
-
The client provides its public certificate to the server.
-
The server validates/verifies the received certificate. The server verifies the certificate through the Certificate Authority for CA-signed certificates.
After completion of the handshake process, the client and server communicate and transfer data with each other encrypted with the secret keys shared between the two during the handshake.

The above process requires that before connecting to any environment (pre-production or production), the DFSP and the Hub each complete the following steps.
TLS server certificates:
| Step | Details | Instructions for DFSPs |
|---|---|---|
1 |
Create a server certificate signed by your CA. |
For detailed instructions, see Appendix A: Create TLS certificates. Alternatively, use your own method for creating your certificate. |
2 |
Share your server certificate and CA chain with the other party. |
For detailed instructions, see section Server Certificates Exchange. |
3 |
Install the other party’s server certificate and CA chain in your outbound firewall (validation/verification will happen against these installed certificates). |
Controlled by the DFSP’s Security team. |
TLS client certificates:
| Step | Details | Instructions for DFSPs |
|---|---|---|
1 |
Generate a Certificate Signing Request (CSR) and share with the other party. |
You have the option to auto-generate a CSR; for details, see section Certificate Authority. Alternatively, you can also manually generate a CSR using your own method or following instructions in Appendix A: Create TLS certificates. |
2 |
Sign the other party’s CSR using your CA. |
Controlled by the DFSP’s Security team. |
3 |
Share the signed client certificate as well as your CA’s root certificate with the other party. |
For detailed instructions on how to share your CA’s root certificate, see section Certificate Authority. |
4 |
Install your own client certificate signed by the other party’s CA in your outbound API gateway. |
For detailed instructions on how to retrieve your signed client certificate, see section CSR Exchange. |
5 |
Install the root certificate of the other party’s CA in your outbound API gateway. |
For detailed instructions on how to retrieve the root certificate of the Hub’s CA, see section Certificate Authority. |
JWS certificates
Whenever an API client sends an API message to a counterparty, the API client should sign the message using its JWS private key. After the counterparty receives the API message, it must validate the signature with the sending party’s public JWS key. JWS is used by the receiving party to validate that the message came from the expected sender, and that it has not been modified in transit.
The above process requires that all DFSPs and the Hub itself have a JWS certificate and that before connecting to any environment (pre-production or production), the DFSP and the Hub each complete the following steps:
| Step | Details | Instructions for DFSPs |
|---|---|---|
1 |
Create a keystore (to hold your certificate and private key), an asymmetric key pair (a public key and a private key), and an associated certificate that identifies you. |
For detailed instructions on how to generate JWS certificates, see Appendix B: Create a JWS certificate. Alternatively, use your own method for creating your certificates. |
2 |
Share your JWS public key. |
For detailed instructions, see section JWS Certificates. |
3 |
Install the other parties' (the Hub and all other DFSPs) JWS public key in your inbound gateway. |
For detailed instructions on how to retrieve the other parties' JWS certificate chain, see section JWS Certificates. |
4 |
Install your JWS private key in your outbound gateway. |
Controlled by the DFSP’s Security team. |
Endpoint information
The Hub and the DFSPs share endpoint information to:
-
whitelist the other party’s public IP addresses in firewall rules in order to allow traffic
-
configure the other party’s callback URLs in API gateways
Typically, access to any incoming and outgoing traffic for a DFSP will be controlled by the relevant Security team. The DFSP’s firewall needs to be appropriately configured:
-
to access the Hub in any environment where the DFSP and the Hub interact, and
-
for the Hub to make callbacks to the Payment Manager of the DFSP
Apart from access to and from the Hub deployed in an environment, all other public access should be blocked to prevent any unauthorised/unwarranted access.
Accordingly, access to the Hub is also regulated. DFSPs have to share their IP address/IP address range from which calls will be made to the Hub so that the firewall on the Hub can be configured appropriately. The Security team within the DFSP should be able to provide that information.
For detailed instructions on how to share endpoint information with the Hub Operator and retrieve the endpoint details of the Hub, see section Endpoints.