Testing Core Connector
Testing locally
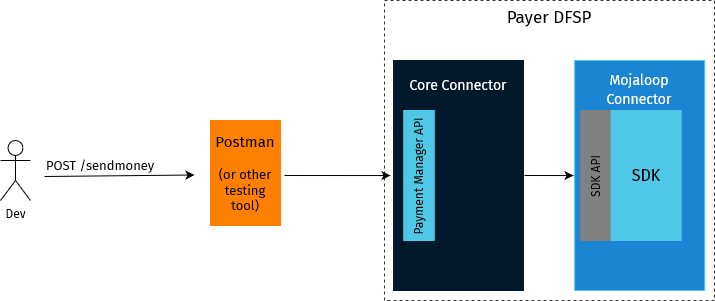
Testing the sending side
When testing the sending side, you can use Postman (or some other testing tool, or curl) to make a call directly to the Core Connector of the sending side, and check if the Core Connector is making a call to the Mojaloop Connector SDK using the right message format.
To test the sending side, follow these steps:
-
Build the Core Connector Maven project:
-
Change directory to the root folder of the Core Connector project — taking the generic template as an example, to
pm4ml-core-connector-rest-template. -
Issue the
mvn clean installcommand.
-
-
Run
java -jar client-adapter/target/client-adapter-1.1.0-SNAPSHOT.jar. -
To test
POST /sendmoney, issue aPOST /sendmoneyrequest to where Core Connector is running locally.
Remove/set headers as indicated in thefrom("direct:postSendmoney")route in the Apache Camel router. -
To test
PUT /sendmoney/{transferId}, issue aPUT /sendmoney/{transferId}request to where Core Connector is running locally.
Remove/set headers as indicated in thefrom("direct:putSendmoneyById")route in the Apache Camel router.
Testing the receiving side
When testing the receiving side, you can use Postman (or some other testing tool, or curl) to make a call directly to the Core Connector of the receiving side.
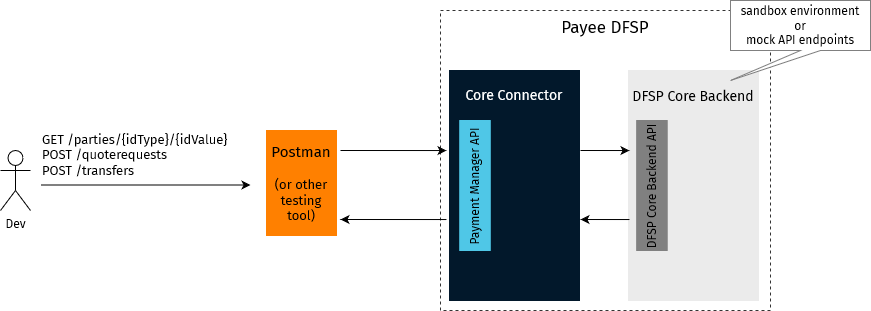
The DFSP Core Backend will either be a sandbox environment of the DFSP backend, or — if you do not have access to that — you can mock up the backend based on the Swagger specification of the DFSP backend API (provided to you by the DFSP CBS vendor) and use dummy responses.
Alternatively, you can use Postman to create a mock version of the DFSP backend.
Testing against a sandbox DFSP backend
To test the receiving side when you have access to the DFSP backend in the vendor’s sandbox environment, follow these steps:
-
Build the Core Connector Maven project:
-
Change directory to the root folder of the Core Connector project — taking the generic REST template as an example, to
pm4ml-core-connector-rest-template. -
Issue the
mvn clean installcommand.
-
-
Run
java -jar client-adapter/target/client-adapter-1.1.0-SNAPSHOT.jar. -
In Postman, issue the relevant request (
GET /parties/{idType}/{idValue},POST /quoterequests,POST /transfers) to the DFSP backend running in the sandbox environment:-
Retrieve the sandbox url from the
client-adapter/src/main/resources/application.yamlfile and add it in the request URL field in Postman. -
To authenticate yourself to the DFSP backend, take the username and password from the
client-adapter/src/main/resources/application.yamlfile, and base64-encode theusername:passwordstring (using base64encode.org). -
In Postman, set Authorization to Basic Auth and provide the username and password.
-
In Postman, on the Headers tab, enter the Authorization key, and set the value to
Basic <base64-encoded username:password string>. -
Remove/set additional headers as indicated in the relevant
from("direct:<request-name>")route in the Apache Camel router. -
Click Send.
-
Check the response in the Response pane.
-
Testing against a mock DFSP backend
To test the receiving side when the DFSP backend is a mock version, follow these steps:
Prerequisites:
-
Make sure you have provided the following value in the
client-adapter/src/main/resources/application.yamlfile:
outbound
	endpoint: http://localhost:<port-where-mock-DFSP-backend-is-running>
Steps:
-
Build the Core Connector Maven project:
-
Change directory to the root folder of the Core Connector project — taking the generic REST template as an example, to
pm4ml-core-connector-rest-template. -
Issue the
mvn clean installcommand.
-
-
Run
java -jar client-adapter/target/client-adapter-1.1.0-SNAPSHOT.jar. -
In Postman, issue the relevant request (
GET /parties/{idType}/{idValue},POST /quoterequests,POST /transfers) to the mock DFSP backend:-
Retrieve the url and port number from the
client-adapter/src/main/resources/application.yamlfile and add it in the request URL field in Postman. -
Remove/set headers as indicated in the relevant
from("direct:<request-name>")route in the Apache Camel router. -
Click Send.
-
Check the response in the Response pane.
-
End-to-end testing
The Hub Operator will have set up a test environment with simulator DFSPs and a Switch. Once changes have been deployed in the test environment, you can perform end-to-end testing leveraging the simulators and the Switch.
Unit testing
Route-level and bean-level changes have to be tested individually, this is done using the Apache Camel testing framework. You can think of this as "black-box testing" where you are only validating the response.
In addition, individual DataSonnet mappings must be tested too. An example of such tests is provided in the pm4ml-core-connector-rest-template repository, in client-adapter/src/test/java/com/modus/client/.